RG35xx Batocera Lite and Koriki Guide
June 2023 – The developer porting Batocera to the RG35xx has stopped development and started working on a fork of Batocera called Koriki which is lighter and less resource intensive. See my updates to the guide below
On the RG35xx, Batocera is a relatively new custom firmware but it brings with it some exciting possibilities. Batocera is a fairly well developed and mature emulation platform based on the Emulation Station frontend and relies heavily on the Retroarch cores to do the emulation backend. If you have used a custom firmware for any of the other Anbernic products, you will be familiar with Emulation Station and Retroarch already.
The team that is porting the Batocera operating system to the RG35xx was one of the first to announce that they managed to unlock the GPU that is inside the device. When Anbernic shipped this device, they purposely kept the GPU locked and relied solely on the CPU to perform all of the emulation heavy lifting. With the GPU unlocked by the Batocera team, it brings some exciting possibilities and potentially even unlocking more systems to emulate on the RG35xx.
If you are looking for a general starter guide for setting up your RG35xx, check out my RG35xx Starter Guide here
With that, let’s take a look at the RG35xx Batocera Lite firmware.
How to install Koriki Firmware on the RG35xx
Important Update June 2023 – The developer working on the Batocera project has decided to abandon the project and shift focus over to porting Koriki on the RG35xx instead due to the high overhead required to getting Batocera to run on the RG35xx.
Koriki is a fork of the Batocera firmware and has many of the same advantages as Batocera like the unlocked GPU. This new firmware is, however, lighter and should therefore have a faster boot time and better performance. As well, it comes with a new lightweight menu based on SimpleMenu.
Installing Koriki on the RG35xx is exactly the same process as installing Batocera. You can use the section below to get started with installing Koriki and all of the tips and instructions related to Batocera are also applicable to Koriki.
All of the instructions and tips found in this guide are still applicable except where I make notes below. If you plan on trying Batocera on the RG35xx, use the Koriki fork instead.
How to install Batocera on the RG35xx
Before you install Batocera, it is important to note that this custom firmware is currently in alpha development. That means that it is still early in its development cycle and likely to still have stability issues, bugs, and be missing a lot of features you may have come to love about the other firmware options available.
Batocera development has stopped as of June 2023 and is now replaced with Koriki. Installation is the same, however, use the Koriki image instead of the Batocera image.
If you are looking for a more mature, stable firmware, I suggest that you take a look at my RG35xx Custom Firmware Guide
Tools you need
- A good quality SD Card and SD card adapter
- A Computer
- The latest Batocera Lite custom firmware image
- Rufus (or other image writing software)
- 7zip
- Windows Disk Partition Tool
- GUIFormat
Make sure that you use a good quality SD card. The last thing you need is to have your SD card corrupt on you and you lose everything. Check out some of my recommendations below
Writing the RG35xx Batocera Image to SD Card
First you need to insert your SD card into your computer. When inserted, Windows will likely tell you that there is a problem with the drive and that you need to format it. Just ignore this message and say NO as we will be formatting the card ourselves in just a moment.
Next we need to download the latest custom firmware image from the Batcoera github repository. The file that you will be looking for should start with batocera-rg35xx (koriki-rg35xx) and have a .img.gz extension
Download Koriki for RG35xx: https://github.com/rg35xx-cfw/Koriki/releases
(no longer actively developed) Download Batocera Lite for RG35xx: https://github.com/rg35xx-cfw/rg35xx-cfw.github.io/releases
Extract the image from the downloaded file using 7zip. The resultant file should be a .img file
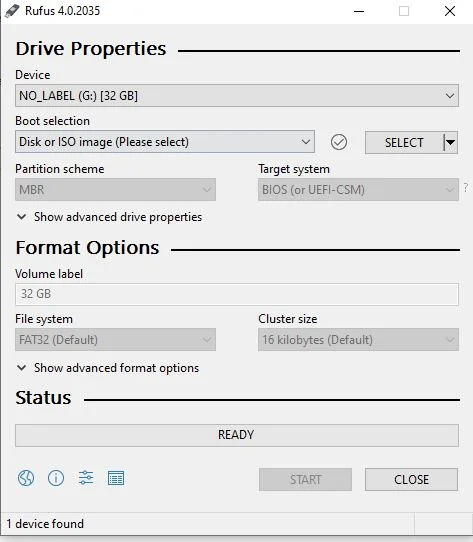
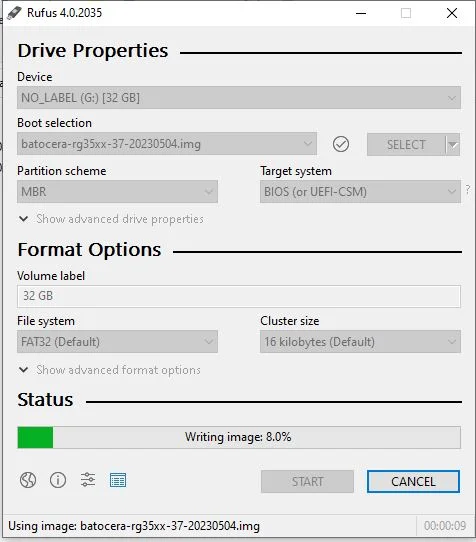
Using the Rufus software, you will be burning the latest Batocera image to the SD card. Open the application and ensure that following fields are setup
- Device = Your SD card
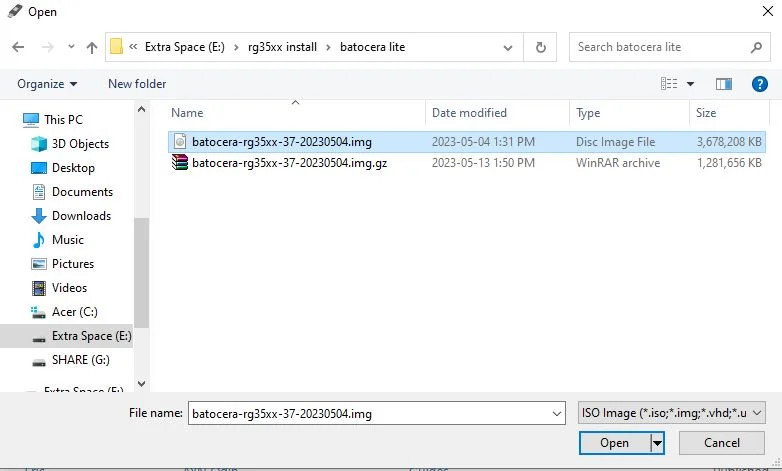
- Boot Selection = Press the select button and browse to the .img file from your download
When you are ready, press the Start button to begin the image burning process
When the image writing process is complete, safely eject the SD card and insert it into your RG35xx device in the TF1 slot and turn on the device.
On first boot, the system will extract the firmware files and expand the remaining space. This will take around 1 minute to complete and when done, the system will drop you into the main menu.
When the initial boot is complete, press the start button and select Quit with the A button and select Shut Down System.
Format the ROM Partition to be read by Windows
Formatting the ROM Partition is no longer necessary as of Koriki build v0.6. The second partition should now automatically be formatted as FAT32 and can be read by a Windows PC.
If you can’t reach the ROM partition on your Koriki installation, you can still use the process below to format it to FAT32.
Next we need to format the SD card partition for our ROMs so that it can be read by a Windows PC. Unfortunately the install process will format the ROMs partition as Linux EXT4 format which cannot be read by Windows/Mac.
To format the partition, insert the SD card back into your PC. Make sure that you do not format the card when asked by Windows.
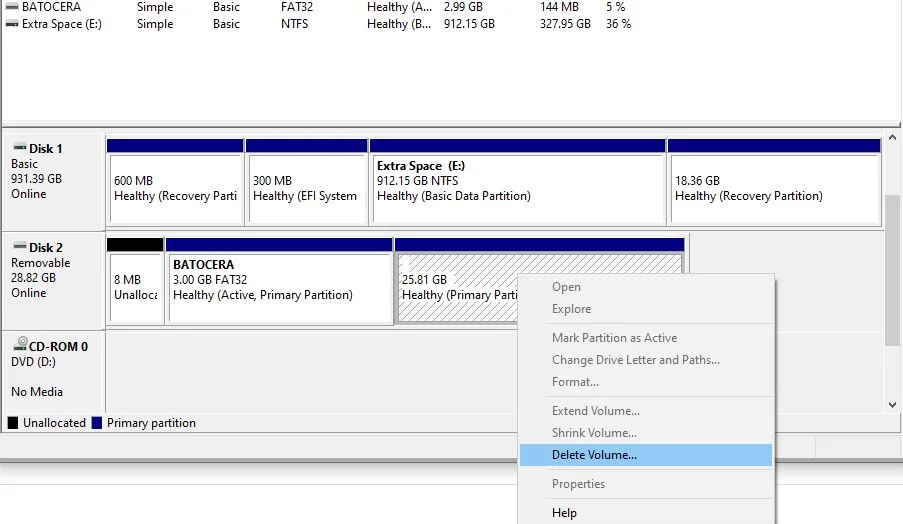
Open the Disk Management tool in Windows by right clicking on the start icon and selecting Disk Management. You can also find it by typing Disk Management into the search bar beside the start icon if you have it enabled. The item will appear as “Create and format hard disk partitions“.
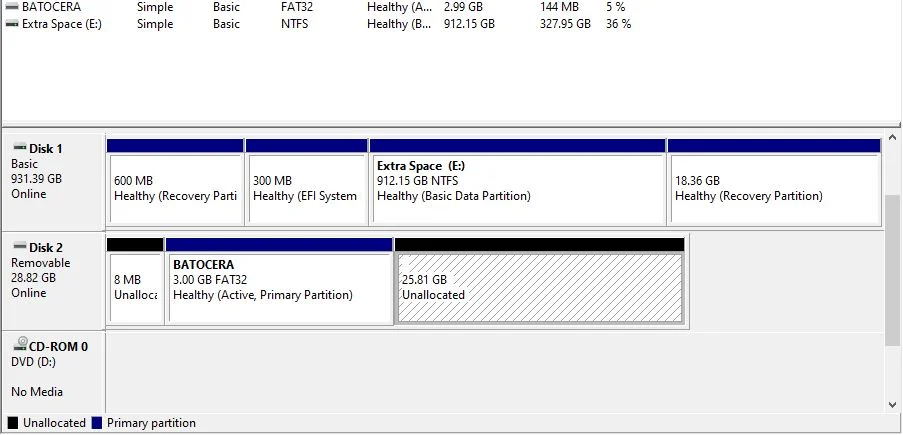
Find your SD card in the lower half of the window (it should appear as “removable” and have a partition called BATOCERA). Beside the Batocera partition should be a large “healthy” partition which uses up the rest of the space on the SD card. Right click on this partition and select Delete Volume.
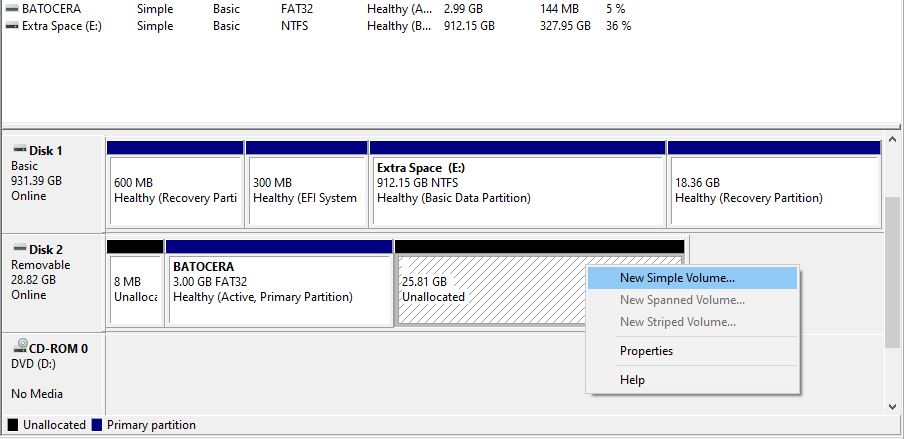
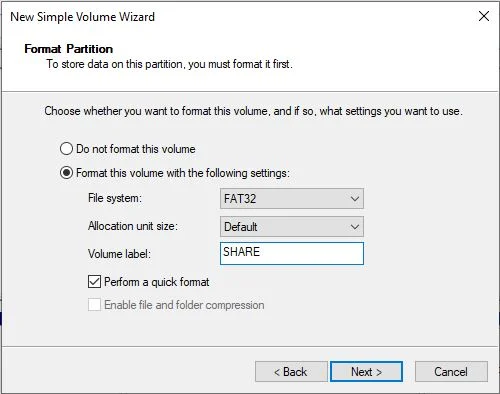
Once the partition has been removed, right click on the now unallocated partition and select New Simple Volume. Click through the wizard until the last step where you need to label the new volume as SHARE and select FAT32 as the format.
Once completed, eject the SD card safely and insert it back into the RG35xx and turn it on again. Batocera will repopulate the SD card again with the file structure it needs.

Populate your ROMS
Now that the SD card is in a format that can be read by Windows and has been repopulated by Batocera, you can turn off the device and pop the card back into your PC.
All of the ROMS will go onto your SHARE partition that we formatted in the previous section. On the SHARE partition is a ROMS folder with subfolders where each folder is named for the system games that the emulator will be looking for by default.
If you want to save some space, the emulators in Batocera are compatible with compressed ROM formats. To learn more about compressing ROMS, check out my guide on How to Compress ROMs files to Save Space
Populate your BIOS files
While you have the SD card in your computer, you will also need to populate your BIOS files for those later gen systems. You can grab these files online or from your Garlic or Stock card if you still have it laying around.
The BIOS files will go onto your SHARE partition in the BIOS folder. You’ll want BIOS files for PSX, NDS and Dreamcast if you plan on playing those systems.
Using Koriki
On the RG35xx, Koriki implements SimpleMenu on top of Batocera with much of the heavy lifting for the lower end consoles done by Retroarch. For the higher end systems, the default (and recommended) emulators are the standalone emulators (e.g. PPSSPP, flycast, mupen64plus, and Drastic).
Koriki Quick Keys
- Start = System Menu
- Select = Per game settings
- A = Select item
- B = Back
- Menu + Vol+/Vol- = Brightness control
- Power Button = Shutdown
The menu is divided into a few different groupings for your gaming systems: Consoles, Handhelds, Home Computers, and Arcades. To find the game system you want to play, you’ll need to press the B button until you get to the base menu then navigate into Consoles, Handhelds, etc depending on the type of system that it is you want to play.
The SimpleMenu interface implements a nice per game setting feature which is accessed by pressing the Select button while you have a game item highlighted. From here you have the option to Overclock the system per game as well as set the emulator per game.
To shut down the system, press the Start button then press the left or right dpad on the Session item until Shutdown is selected then press A. As of build 0.7.2, you can also shutdown with a quick press of the power button.
Using Batocera Lite
On the RG35xx, Batocera is based on the Emulation Station frontend with most of the backend work being done by Retroarch.
Batocera Quick Keys
- Start = System Menu
- Select = Emulation Station Menu Setup
- A = Back
- B = Select item
- Menu + Start = Exit Game
The first thing I did when I started up Batocera was to disable the Menu Music. You can do that by pressing the Start Button -> Sound Settings -> Frontend Music = Off
Now that we have that out of the way, let’s start playing with those higher end emulators that Batocera has enabled for us.
Keep in mind that the RG35xx is still a very low powered device compared to many of the other devices available and that is to keep the price low. As well, Batocera is an experimental firmware that is still in the alpha stages. You should not expect great performance on any of these additional systems and everything here should be considered a bonus, not a given, for this system.
Overclock the device
To emulate higher end systems in Batocera, I recommend that you overclock the device. To set the clock speed in Batocera, press the Start Button and go to System Settings. Scroll down to Overclock and set the clock speed to Turbo (1392 MHZ). I found this to be the best setting as the Extreme setting causes the device to get very hot.
To set the CPU Clock speed in Koriki, press the Start Button and go to the System menu. Scroll down to CPU Clock and press DPad Right until the speed is set to 1296Mhz.
To apply the settings, you need to reset the device.
Keep in mind that setting the clock speed higher will also reduce the battery time as it consumes a lot more energy.
Tune your Retroarch settings
When using Retroarch based cores for later systems like PSX using the PSCX Rearmed core, one of the most important performance settings to change is to make sure that you turn Threaded Video to ON to increase your performance.
To turn on Threaded Video in Retroarch, load up a Retroarch based emulator then press the Menu key to open the Retroarch menu.
From the Quick Menu (default menu), press the B button to go back to the Main Menu, then press Left to highlight the menu area selections and scroll to the Settings menu. Press right to go back to the menu selections and down to Video. In this menu, turn ON the Threaded Video option.
To save your option globally for all other retroarch cores, go back to the Main Menu and scroll down to Configuration File. Under this menu, press on the Save Current Configuration option to save a global setting for all retroarch cores.
RG35xx N64 Emulation in Batocera
Yes, the RG35xx is technically able to emulate some N64 games pretty well. The original N64 controller had more usable buttons than the RG35xx so you may also run into issues with button mapping for some games.
To get the most out of the RG35xx when it comes to N64 performance, follow these settings
Choose the right Emulator
While the system offers a number of different emulator cores for N64 emulation, none of the Libretro cores will boot.
In Koriki: You will have to set the emulators per game if you want to override the default. To do this, select the game then press the Select button and set the emulator to mupen64plus_rice_sa
In Batocera: To set the new default N64 core, press the Start button -> Game Settings -> Per System Advanced Configuration -> Nintendo 64
Set the Emulator to Mupen64Plus: Rice. I found this core to have the best performance and compatibility on the RG35xx
Everything else can stay at default settings.
RG35xx Batocera N64 Compatibility List
Here is a list of some N64 games that I found to work OK on the RG35xx through initial testing
- Banjo Kazooie
- Diddy Kong Racing
- Golden Eye 007 (some dips in framerate)
RG35xx PSP Emulation in Batocera
PSP Emulation on the RG35xx is possible and some games are even playable. Keep in mind that the chip in the RG35xx is just not powerful enough to emulate most games at full speed so there will be slowdowns and lots of frameskip required to even have a chance.
If you want to try emulating PSP on the RG35xx, I suggest modifying the following settings.
In Koriki: Set the emulator to per game to ppsspp_sa which uses the Stand Alone core.
In Batocera: The standalone PPSSPP core has much better performance so, at the main menu, set the default PSP core in Emulation Station by pressing the Start button -> Game Settings -> Per System Advanced Configuration -> Playstation Portable. Set the default core to PPSSPP (not the Libretro) core.
Once you have the core set, launch a game and open the PPSSPP menu by pressing the Menu button. In the PPSSPP menu, set the following
- Frameskip = 1
- Auto frameskip = Yes
- Skip GPU Readbacks = Yes
- Lazy texture caching = Yes
- Splin curves quality = Low
- Hardware transform = Yes
- Software Skinning = Yes
- Anisotropic Filtering = Off
- Tools -> System -> Emulated Clock Speed = 111 MHz
This will give you to best chance to play games. Any 3D heavy game will not have much of a chance to work so stick with 2D games.
RG35xx Batocera PSP Compatibility List
Here is a list of a few PSP games that I found to work OK on the RG35xx through initial testing
- Spider-man Friend or Foe
- Sid Meier’s Pirates!
- PixelJunk Monsters
- Naruto Shippuden Ultimate Ninja Heroes 3 (frameskip definitely needed and still gets dips in framerate)
RG35xx Nintendo DS Emulation in Batocera
In Koriki: Nintendo DS emulation currently works decently in Koriki. The default emulator is Drastic. The DPad is simultaneously mapped to the NDS DPad and also controls the pen on screen.
Use the L2 button to switch between split screen and single screen mode and the Menu button to bring up the Drastic menu.
In Batocera: The best emulator available to play NDS games on the RG35xx is Drastic, however, as of Dev 37 you cannot directly launch games via the Emulation Station menu so as a workaround you need to add Drastic as a port and launch it as a standalone through Ports.
See this Github issue for information on how to add Drastic as a Port to launch standalone
RG35xx Batocera Nintendo DS Compatability List
Here is a list of a few NDS games that I found to work well on the RG35xx through initial testing
- Mario Kart DS
- Sega and Sonic All Star Racing
- Civ Rev
RG35xx Dreamcast Emulation in Batocera
Dreamcast emulation on the RG35xx is going to be quite a bit of a reach for this little system and you are going to have to make a lot of sacrifices and set your expectations pretty low. But, if you are interested in giving it a try, here are my recommended settings.
Set the emulation core to Libretro Flycast core.
Make sure that you have the Dreamcast bios files loaded into the Bios folder on your SD card.
Once you start a game, press Menu + B to open the Retroarch menu. From there, navigate to Core Options.
System Options
- Make sure that everything is set to OFF
Video Options
- Internal resolution 640 x 480 (lower doesn’t seem to make much difference in framerate)
- Alpha Sorting = Per-Strip
- Everything else set to OFF
Performance Options
- Threaded Rendering = ON
- Auto Frame Skip = Maximum
- Frame Skipping = 1
Set up your controller for Dreamcast Emulation
With the lack of analogue sticks on the RG35xx, you’ll need to configure your D-Pad to act as the left analogue joystick.
Inside of a game, open the retroarch menu by pressing the Menu + B button. Scroll down to Controls. Under the Port 1 Controls, remap the following
- D-Pad Up Hat #0 = Analog Y-
- D-Pad Down Hat #0 = Analog Y+
- D-Pad Left Hat #0 = Analog X-
- D-Pad Right Hat #0 = Analog X+
More Reading..
-
How to Download GarlicOS Box Art
GarlicOS is a fantastic custom firmware that greatly improves the experience on the RG35xx. It is lightweight and intuitive to use as well as pretty…
-
How to install GarlicOS on RG35XX
In this guide, I will show you the steps on how to install GarlicOS on your RG35xx device. The process is very easy and with…
-
RG35xx Replacement Buttons Install Guide
In this RG35xx replacement buttons install guide, I will be guiding you through the process of replacing the front face buttons on the RG35xx. RG35xx…
-
RG35xx Starter Guide
The RG35xx is Anbernic’s answer to the widely successful Miyoo Mini. The RG35xx covers the cheap, ultra portable segment of the retro handheld gaming market…
-
RG35xx Themes Installation Guide
It’s not hard to see why GarlicOS is the most popular custom firmware available for the RG35xx. In addition to being fast and vastly improves…
-
RG35xx Ports Installation Guide
While the RG35xx is primarily a handheld device designed to play games from home and handheld consoles, did you know that it can also play…