How to Compress ROMs files to Save Space
In this guide I will show you the tools you need and how to compress ROMs files for various systems in order to save space and get more games onto your retro handheld device.
The prices of good quality SD cards can fluctuate and so it’s always a good idea to keep an eye out for a deal and grab one while you can. I always recommend that you grab a quality name brand like Sandisk or Samsung Evo
Many of the older retro systems were very limited in terms cartridge size and had to squeeze all of their game content into 8, 16 or 32MBs. But with the advent of optical disc storage on CDs and later DVDs, developers could start making bigger games and that means more space is required for their ROMs now that we are emulating them.
Below, I will show you how to compress the ROM files for a number of those systems so that you can maximize the number of games you can carry around in your pocket!
NES, SNES, GB, GBC, GBA, Sega
These cartridge based games come in a variety of formats depending on the system but they can all be compressed down into a .zip format
While these old systems already had pretty small file sizes due to the limitations of memory chips onboard the cartridges at the time, with many roms the total size can add up. Many of the emulators including the Retroarch cores for these systems will support reading the files directly from a .zip file
Tools Needed
How to use it
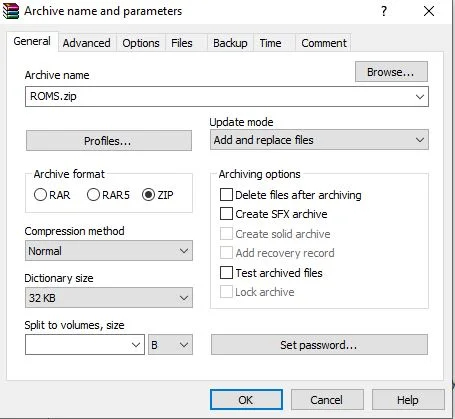
Once Winrar is installed, you can easily zip individual ROMs by right clicking on the file and selecting Add to Archive then ensure that you’ve selected the ZIP archive format
Since the emulators can only read a single ROM from a zip file, you’ll need to zip each ROM individually, however, it is possible to zip many ROMs into individual files all at once.
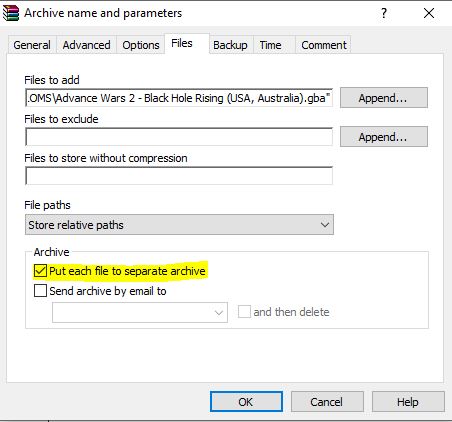
Select all of your ROMs at once then right click on them and select Add to Archive. Ensure the archive format selected is ZIP then click the Files tab and select Put Each File into Separate Archive
Playstation (PS1/PSX)
Playstation roms generally come in a .bin/.cue format and you can compress ROMs down to a single file .chd format
Many of the frontend interfaces tend to read the .bin/.cue as two or more games even though they are all files for a single game. One of the main advantages of compressing .bin/.cue to .chd is that it eliminates the two or more files per game into a single file.
Tools Needed
How to use it
CHDMAN is a command-line program but for the purposes of this guide, I’ve included a simple batch file in the above .zip which allows for you to convert your .bin/.cue files in bulk
To convert your Playstation roms, first extract the CHDMAN.zip file to it’s own folder. You should have an .exe and two .bat files
Now extract your rom file that you want to compress into this same folder
Run the .bat file called ‘Cue or GDI to CHD.bat’
This will mass convert all of your .bin/.cue files into .chd files of the same name. The .chd file is your compressed rom which can be read by most Playstation emulators
Dreamcast
Dreamcast roms generally come in a .gdi/.bin or .bin/.cue format and can be compressed down to a single .chd file
Many emulators will read the multiple files needed for the game as multiple, individual (duplicate) games so the advantage of this method is that it not only compresses the space required, but it also gives you only a single file
Tools Needed
How to use it
CHDMAN is a command-line program but for the purposes of this guide, I’ve included a simple batch file in the above .zip which allows for you to convert your .gdi/.bin or .bin/.cue files in bulk
To convert your Dreamcast roms, first extract the CHDMAN.zip file to it’s own folder. You should have an .exe and two .bat files
Now extract your rom file that you want to compress into this same folder
Run the .bat file called ‘Cue or GDI to CHD.bat’
This will mass convert all of your .gdi/.bin or .bin/.cue files into .chd files of the same name. The .chd file is your compressed rom which can be read by most Dreamcast emulators
Playstation 2
Playstation 2 roms generally come as a .iso file and you can compress ROMs down to a single .chd file
Tools Needed
How to use it
CHDMAN is a command-line program but for the purposes of this guide, I’ve included a simple batch file in the above .zip which allows for you to convert your .iso files in bulk
To convert your Dreamcast roms, first extract the CHDMAN.zip file to it’s own folder. You should have an .exe and two .bat files
Now extract your rom file that you want to compress into this same folder
Run the .bat file called ‘ISO to CHD.bat’
Gamecube
Gamecube games generally come as a .iso file and you can compress ROMs to a .rvz or .gcz file
Both of these compressed formats are compatible with the popular Dolphin emulator, however, the .rvz requires a newer version but also has a higher compression rate and therefore saves you more space
Either one of these compression techniques can be done via the Dophin Emulator GUI
Tools Needed
How to use it
This technique works in any version of the Dolphin emulator including Windows, Mac and Android
Simply open the Dolphin emulator. With your games loaded
- Right click or Long Press on the game you want to compress
- Select GCZ or RVZ under the Format option
- Keep all of the recommended additional settings
- Press Convert
That’s it! Now you can either transfer your compressed file to your retro handheld device. If you used the Android app to compress the file, be sure to delete the original .iso as this process results in a second compressed file and leaves the original in place.
Wii
Wii games generally come as a .iso file and you can compress ROMs into a .rvz file
Either one of these compression techniques can be done via the Dophin Emulator GUI
Tools Needed
How to use it
This technique works in any version of the Dolphin emulator including Windows, Mac and Android
Simply open the Dolphin emulator. With your games loaded
- Right click or Long Press on the game you want to compress
- Select RVZ under the Format option
- Keep all of the recommended additional settings
- Press Convert
That’s it! Now you can either transfer your compressed file to your retro handheld device. If you used the Android app to compress the file, be sure to delete the original .iso as this process results in a second compressed file and leaves the original in place.
Playstation Portable (PSP)
Playstation portable (PSP) games generally come as a .iso file and you can compress ROMs into a .cso file
Tools Needed
- CISO GUI (link to the ppsspp forum post with download link)
How to use it
Open the file CISO GUI.exe
This file is a GUI for the command line ciso.exe which will allow you to batch convert many PSP iso files at once
In the CISO GUI interface, drag and drop your PSP .iso files and press the Compress button. When prompted to Overwrite Existing? Press Yes
Your output files will be .cso which can be transferred to your retro handheld and read by PPSSPP. The great this about this format is that PPSSPP will recognize it as the same game as the .iso file and all of your configs and saves will be intact.
Bonus: Multi-disc PS1/PSX roms to a single file PBP
While the optical storage format of the PS1/PSX allowed for large game files, many developers pushed this limit even further with Multi-Disc games
This means that some game roms will not only come as multi-file .bin/.cue but also multi-disc with .bin/.cue for each
Tools Needed
How to use it
Open PSX2PSP.exe and select Classic Mode for the easiest interface
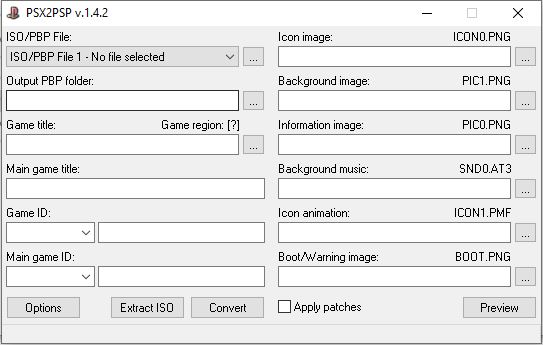
In the first field labeled ISO/PBP File you’ll see File 1 – No File selected. Beside the field is a button with three dots (…). Press this button to select the first file of your multi-disc game
Next, click on the dropdown list of the ISO/PBP File field and select file 2 then the (…) button to select the second file of your multi-disc game.
Repeat this process for all of the discs required
Under the Output PBP Folder, select the folder where you would like the output file to be saved
Now press the Convert button in the bottom centre
In the output folder you will see a subfolder named with the serial number of the game. Inside this folder is a file called EBOOT.PBP. Re-name this file to your game name and transfer it to your retro handheld device. This file type will work with most Playstation emulators