Powkiddy RGB30 CFW Guide
In this guide, I will explore some of the other RGB30 CFW options available and discuss their pros and cons and who might want to use them. So, let’s dive in.
The Powkiddy RGB30 is yet another device based on the RK3566 chipset. It also means that there are a number of established custom firmware options that are already available.
The RGB30 ships with JELOS which is an OS originally started as a custom firmware option for other RK3566 devices. As a result, the pre-installed operating system on the RGB30 is quite good.
If you are looking to get started with JELOS on the RGB30, be sure to check out my Powkiddy RGB30 Setup Guide
Even though the operating system that comes with the RGB30 is already quite good, more options are always welcome!
JELOS (Just Enough Linux Operating System)
The operating system that comes pre-installed on the RGB30 is known as JELOS. This operating system was originally developed as a custom firmware option for other rockchip-based handhelds.
JELOS is no longer being actively developed and has instead continued under the new name of ROCKNIX. For more information on the ROCKNIX project, check out the next section.
JELOS uses Emulation Station as the frontend menu system and the majority of the emulators are configured to use Retroarch with a few of the higher-end systems using Stand Alone emulators.
RGB30 JELOS Download Link: https://github.com/JustEnoughLinuxOS/distribution/releases
Features:
- Bluetooth support: Yes
- HDMI Output support: Yes
- OTA Updates: Yes
- Portmaster Support: Yes
Quick Key Reference
- Select (menu) = Item options menu
- Start (menu) = System Menu
- Y = Favortite item
- A = Launch item
- B = Back
- Start + Select x2 (in game) = Quit Game
- Select + X = Retroach Menu
PROS
There are a few things that I really like about the JELOS CFW:
- Easy to Navigate
- Intuitive “console-style” menu
- Emulators are pre-configured with settings that work well to give the best performance
- Ability to quickly set some basic emulator settings from the menu without having to mess around with Retroarch menus
CONS
Overall, I would consider JELOS to be a very good operating system, however, there are a few things I don’t like about it:
- JELOS is considered an “OS for developers”. As such, there is limited community support and things are prone to break between updates
- The initial build that came shipped with my device suffers from pretty bad battery drain issues. This has been fixed somewhat in newer updates but is still not great
Who Should use this CFW?
This is the default operating system that comes shipped with the device. It is quite good though it does have some drawbacks. Overall, if you don’t feel like messing around with installing custom firmware, this one will work just fine.
ROCKNIX
With the JELOS custom firmware no longer being actively developed, a team of developers from the original project have continued development under a new name: ROCKNIX.
ROCKNIX is a continuation of JELOS and so incorporates everything that JELOS was and adds new features, bug fixes, and enhancements.
RGB30 ROCKNIX download link: https://github.com/ROCKNIX/distribution/releases/
Who Should use this CFW?
If you were using JELOS as your primary CFW and wish to get the latest updates and bug fixes, then you will want to switch to the ROCKNIX CFW.
ArkOS
ArkOS is another mature firmware that has been around for a while and is available on many devices.
Similar to JELOS, ArkOS is also based on the Emulation Station frontend and uses Retroarch cores as its main driver for most of the emulated systems supported on the RGB30.
One of the key differences between JELOS and ArkOS is the ability to quickly configure emulator settings directly from the menu. While JELOS supports this option, ArkOS requires more in-depth knowledge of the Retroarch menu system which can be quite intimidating to new users.
Luckily, ArkOS is already configured with some really good settings to make the emulators just work well out of the box without having to mess around.
RGB30 ArkOS Download Link: https://github.com/christianhaitian/arkos/wiki#download-links
Features:
- Bluetooth support: Yes
- HDMI Output support: Yes
- OTA Updates: Yes
- Portmaster Support: Yes
Quick Key Reference
- Select (menu) = Folder or Item options menu
- Start (menu) = System Menu
- Y = Favortite item
- A = Launch item
- B = Back
- Start + Select x2 (in game) = Quit Game
- Select + X = Retroach Menu
PROS
ArkOS is my current RGB30 CFW favourite. This is the operating system that I have installed on my device and there are many reasons for this
- Easy to Navigate
- Intuitive “console-style” menu
- Emulators are pre-configured for really good performance on this device
- From my experience, ArkOS has better N64, Dreamcast, and PSP performance over JELOS though this may change with more updates of JELOS
- Highly Configurable
- Great Community support and responsive developers
CONS
While there are many things to love about ArkOS as my RGB30 CFW of choice, there are a few things I don’t like about it
- You need to have a more in-depth knowledge of Retroarch to configure emulator performance and other settings
Who should use this CFW?
While ArkOS and JELOS share many similarities, I prefer ArkOS as my daily driver for improved performance in higher-end systems like N64.
Using this custom firmware does require some more knowledge of Retroarch as the emulator configuration options are not available via the menu like in JELOS, but if you are comfortable with that, ArkOS is a great firmware option with lots of community support.
MinUI
MinUI is another CFW that’s been available on other devices such as the RG35xx and Miyoo for a while now. This is the first rk3566 device, however, and so it is still in very early development for the Powkiddy RGB30.
MinUI is specifically designed to be minimalistic with few setup options or configurations available. It is more suited for a simple pick-up-and-play style of gaming with a quick boot time and easy access to all of your emulated games.
It also supports autosave and resume functionality with the power button. Simply turn off the device while in a game and the system will create an autosave which will automatically be loaded when you turn the device back on.
RGB30 MinUI Download Link: https://github.com/shauninman/MinUI/releases
Features:
- Bluetooth support: No
- HDMI Output support: Yes
- OTA Updates: No
- Portmaster Support: No
Quick Key Reference
- A = launch game
- B = Back
- X = launch save state (if one exists)
- L3/R3 (in game) = open system menu for save/load and quit
- Power (short press) = sleep
- Power (long press) = Shutdown (autosave then shutdown when in game)
PROS
I used MinUI extensively on my RG35xx and love it there for its simplicity. It makes getting in and out of games very easy and the power button autosave and resume feature allows me to pick up the device for a few minutes at a time and put it back down only to resume again when I have a few spare moments.
- Minimalistic design
- Fast Boot
- Autosave and resume on the power button
CONS
MinUI was originally developed for lower-powered handhelds and as a result, it does not yet support some of the higher systems that the RGB30 is able to emulate including NDS, PSP, Dreamcast or N64
- No current support for higher end systems the RGB30 can emulate
- PSX emulation was not optimized
- No Bluetooth or OTG controller support
Who should use this CFW? The minimalistic design makes this an easy to recommend UI if you plan to give the device to a child or someone who is not tech savvy and just wants to play some old school games from PS1 or earlier.
If you want to play NDS, N64, Dreamcast, or PSP, then this CFW is not for you though I do expect that these systems will be supported as development continues. I am excited about this CFW and will continue to follow its development for the RGB30.
How to install CFW on the RGB30
How to install JELOS/ARKOS on RGB30
JELOS and ArkOS both have a similar process for installing either Custom Firmware to the device.
The first thing that you will need is a good, high quality SD card for a fresh install. I recommend anything from SanDisk or Samsung which you can pick up from Amazon
The next thing that you will need is the Image file (.img) for the respective CFW found in the download links above. When downloading the image file, be sure to select the one specifically designed for the RGB30 as both JELOS and ArkOS are available on multiple devices each with their own device specific image files.
The image file will be compressed in a zip, xz or gz archive so we will need to extract that image using an archive tool like 7-zip. Please the extracted .img file into a temporary folder.
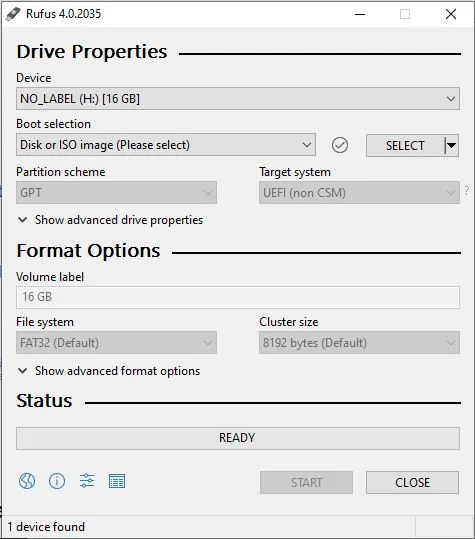
Now we can insert our blank SD card into the computer and use our favorite image burning software. I personally use Rufus as it is lightweight and free.
Select the image file that we downloaded from our CFW repository and tell it to burn to our blank SD card and wait until the process is complete.
When the process is done, safely eject the SD card from your computer and insert it into the TF-OS slot on the RGB30 and boot it up.
The first time you boot up the device with a new image, the system will go through an initialization process and get the file structure ready. Once completed, you’ll land on the main menu and you are ready to go.
If you are looking for more information on using your RGB30 for the first time, be sure to check out my Powkiddy RGB30 Setup Guide for tips and tricks
How to install MinUI on RGB30
The MinUI installation process is a little different than your standard image burning process.
The first thing that you will need is not one, but two SD cards as the first card is for the OS and the second card is for your games. I recommend a small SD card of 8 or 16GB for the OS and a larger SD card for your games depending on how many you plan on adding.
First SD Card
On the first SD card we will need to download and burn an image for the “MinUI OS Sub System” which can be found at the download link below
MinUI OS Sub System download link: https://github.com/shauninman/Moss/releases/
You want to download the gz file and extract the contents to a temporary folder.
Using your favorite image burning software, burn the image to the first SD card. You can follow the instructions above for the JELOS/ARKOS installation to burn the image if you are not familiar with the process.
Second SD Card
On the second blank SD card, we want to make sure that the card is formatted as FAT32. Insert the card into your PC and right click on it and format it as FAT32 and name it TFGAME
If your SD card is larger than 32GB, you’ll need to use a special tool called guiformat as Windows cannot properly format cards larger than 32GB to FAT32.
Next we need to grab the latest release of MinUI from their github. You can use the link below
RGB30 MinUI Download Link: https://github.com/shauninman/MinUI/releases
Extract the contents of the base.zip file to your newly formatted second SD card. You will also want to download and extract the extras.zip to your SD card being sure to replace any files already there.
First Boot of MinUI
Now that we have prepared both SD cards, insert your first SD Card with MOSS into the TF-OS slot on the RGB30 and the second SD card called TFGAME into the TFGAME slot.
Turn on the RGB30 for the first time and MinUI will go through an initialization process and create the files it needs to run. Let this run for a few minutes until you ultimately boot into the MinUI menu. You should see Tools and that’s pretty much it.
Turn the RGB30 off by holding the Power button for a few seconds. Now eject the TFGAME SD card and insert it back into your computer and add the games you want to the ROMS folder under the appropriate subfolder and your BIOS files to the BIOS folder in the appropriate subfolder.
More Reading…
-
Powkiddy RGB30 Ports and Portmaster
The Powkiddy RGB30 is not only capable of emulating home and handheld consoles all the way up through Dreamcast and N64, but did you know that it…
-
Powkiddy RGB30 Setup Guide
The Powkiddy RGB30 is a new device using the RK3566 chipset that has been in many devices this year including a number of other devices from Powkiddy…